Clone yourself using Video Masks
Create clones of yourself to create unique effects or interact with a twin
The ability to clone yourself with video masking gives you the ability to interact with a twin, change the reflection in a mirror, or even duplicate yourself to show time passing in a room. Simply capturing multiple videos from the same angle and importing your clips into a video editor with these tools like VideoStudio will allow you to create the illusion of clones in your video. You can clone yourself in a video by overlaying multiple clips with picture in picture overlays, or video masking tools.
Picture in picture means overlaying one video clip over another. Picture in picture overlays are most often used for multi-camera videos such as gaming videos, where two angles need to be shown at once. This technique can also be used to create clones of yourself by cropping out a section of one recording to put over the video beneath, giving the illusion that both were recorded at the same time.
Video masking takes this power one step further, giving you the ability to extract that clone in any shape you choose to overlay. This means that you aren’t stuck to a rectangular shape for cloning yourself, and can cut out more of the background to just show the clone you created over the clip. The results with video masking are usually much more seamless around the edges, so using a video editor like VideoStudio to achieve the cloning effect is recommended.
Cloning yourself one or multiple times in a video is not only a really cool effect, it is pretty easy to accomplish! Let’s take a look at the steps you need to follow to clone yourself with video masking in VideoStudio. You can follow these same steps with different recorded clips to have your clones doing completely different things in your video.
-
Record your clips
The first step is to record the individual clips that you plan to combine. Having a plan for what you want each clone to be doing will help ensure you can record all the clips efficiently.
Tip: For best results, keep the camera fixed in one place and film all the segments you wish to combine from that same angle. Try not to overlap the clones much, as the overlapping clones will be more time consuming to edit! The closer the camera positions are to each other between the recordings, and the more separate your clones can be, the easier it will be to achieve a seamless end result.
-
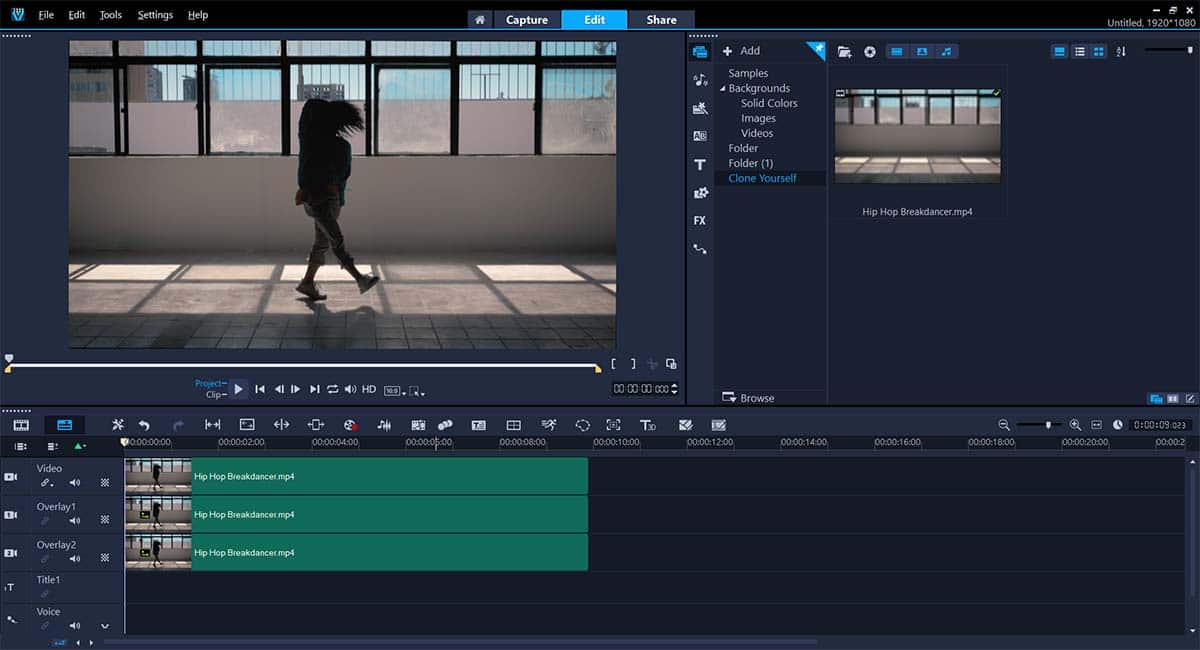
Import your clips to VideoStudio
Simply drag and drop to arrange your clips on the timeline, adjusting the start positions so that the timing fits your needs. For example, if your clones are talking to each other or walking in an area, you can align the talking points to ensure the conversation is natural. You can always adjust this again after creating the mask, but keeping this in mind at this phase can save you time!
![Import your clips to VideoStudio]()
-
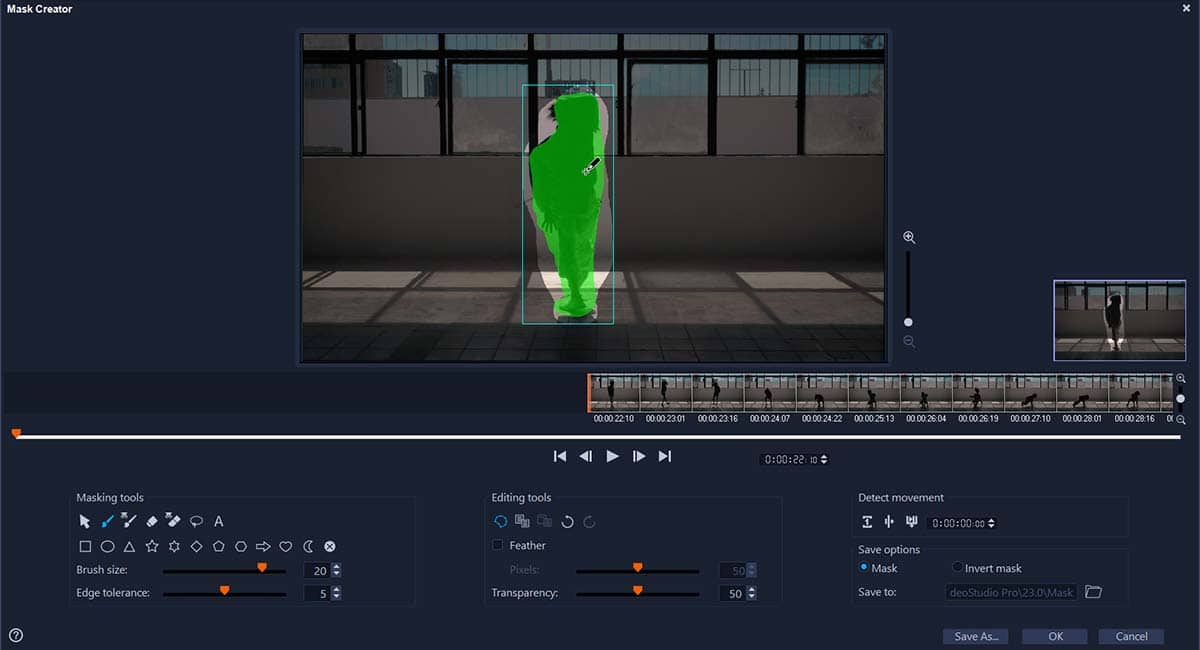
Create the mask
Select the clone clip and open the Mask Creator. Select the clone you wish to extract from the video using the masking tools. The pen tool works well for this!
Note: The mask does not have to be exact. You can feather the mask to blend the edges to improve the smoothness of your end results. The more consistent your camera position is between recorded clips, the less precise your mask must be.
![Create the mask]()
-
Track motion
Select ‘Detect motion and track to end of clip’, and VideoStudio will automatically move through the rest of your footage, tracking the subject you have marked. This will extract the clone from the footage, making it appear to be combined with the clip beneath it.
If you notice the mask moving off your clone too much, you can stop the tracking, go back to the point at which the mask went off track, correct it with the masking tools, and click ‘track motion to end of clip’ again.
Note: If you were able to record your clips from the same camera angle, your mask should need minimal adjustments.
![Track motion]()
-
Repeat the above steps to mask all your clones
When you’re happy with the mask, click ‘OK’ to add it to the timeline. Repeat the above steps for all the recorded angles of your clones. By the end of these steps, you should have masks with all of your clones extracted on the timeline.
-
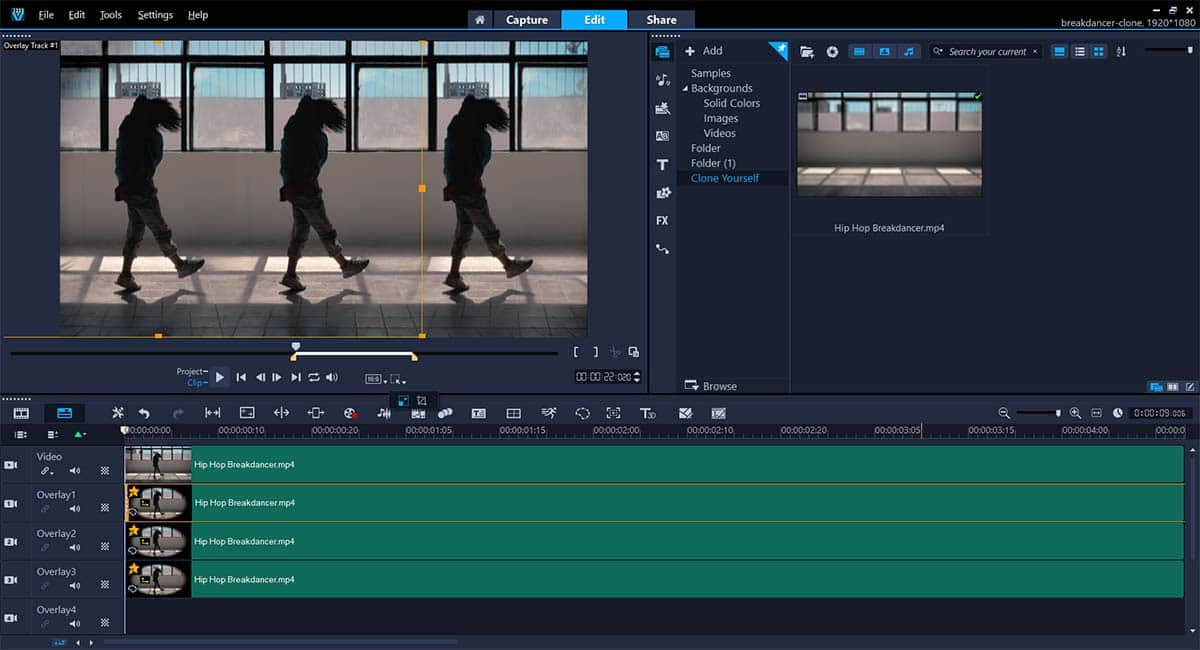
Adjust the clips
For the final step, scrub through your project to make sure you’re happy with the results!
You can always re-adjust the mask in the mask creator, or drag the clips on the timeline so the timing fits your project. You can add more clones by repeating the steps above until you’ve achieved your desired effect!
![Adjust the clips]()

If you mask different clips instead of the same clip as shown above, you can have your clones interact with each other, do unique tasks, or even have a conversation! Video masking can be used for creative effects beyond The same process shown above to create a video mask to clone yourself can be applied to creating unique transitions. See how to accomplish walk-by and door-opening scene transitions by following the steps outlined here.
Get started now with VideoStudio
Use the creative, flexible and easy tools in VideoStudio to edit your next video project, and watch it come to life in ways you never imagined!